This was a fun one. To be honest, I even liked it more than my previous favorite, "Active". The "theme" of this box was tunneling, in the several forms it appears. SSH, VPN, Proxy. It was a great learning experience for me, I especially learned a lot about netcat and networking in general.
So, let's start with the obvious first step: nmap.
Nothing fancy here. We have an SSH and an HTTP port. SSH is not a very good initial attack vector in most cases, so let's take a look at Port 80. Just browsing to the root directory gives us some text. The two most interesting parts here are: "Welcome to the Slowdaddy web interface" "We are proud to announce our first client: Sparklays"
We COULD boot up dirbuster (or similar) and try to bruteforce the subdirectories, but why not go with that's presented to us? Browsing to /slowdaddy leaves us with a 404, but /sparklays gives us a 403 - that means, /slowdaddy does not exist, but /sparklays does, we just don't have the required permissions (yet) to access it. This gives us a starting point to bruteforce, and if we do, we will quickly find the subdirectory /sparklays/design with the pages /sparklays/design/design.html and /sparklays/design/changelogo.php as well as the subdirectory /sparklays/design/uploads. If we browse to /sparklays/design/changelogo.php, we will find an option to upload files. The experienced hacker will instantly know that this is a possible vector, with the possibilities of uploading webshells, reverse shells or other malicious files.
Trying to upload a file like "my_shell.php" will result in the website responding with "I'm sorry, Dave, I can't let you do that" "sorry that file type is not allowed". With some knowledge about bypassing such upload filters we eventually get to upload a file called "my_shell.php5". The only thing left now is to set up a listener (e.g. netcat or Metasploit's /exploits/multi/handler) and execute the uploaded file somehow to get a shell. (The listener obviously becomes obsolete if we go with a webshell instead of a reverse shell). For this, we can take a step back and try the obvious first: /sparklays/design/uploads seems like a directory that could potentially contain the uploaded files, so /sparklays/design/uploads/my_shell.php5 should do what we want (Spoiler Alert: it does).
Let's just go over some of the details of what just happened. First, we created a malicious PHP file that grants us a shell. We can write our own shellcode, pull it from exploit-db or just generate it using msfvenom. It's definitely a good skill to have to be able to write your own shellcode, but depending on what you want to achieve, the immense convenience tools like msfvenom provide should not be neglected, either. For a reverse shell, a command like this:
As msfvenom normally prints the result to stdout, > my_shell.php5 conveniently redirects the output into a file called "my_shell.php5" for us to use. We can set up our netcat listener like this:
nc -lvp [Port]
The parameters just mean listen with verbose output on port [Port]. And once we uploaded the file and opened it in the browser at /sparklays/design/uploads/my_shell.php5, we get the following:
Whereas whoami and pwd are commands I entered and the respective following line is the output.
Netcat is often available per default on most *nix-based systems, so it really helps to get familiar with it. But, as I said before, convenience should not be neglected, so I will also elaborate on using a so-called meterpreter, if we have Metasploit available on our machine. The payload creation is similar, only that we use another kind of payload:
Instead of using netcat as a listener, though, we use metasploit:
With either run or exploit we can then start the listener, and once we uploaded and browsed to our payload, we can see this:
The meterpreter is a bit different from a normal *nix or Windows shell, but it offers a great amount of extended functionality (some of which we will come to later).
A hint for the future:
Now that we have a shell, either a "normal" one or a meterpreter, we can scour the file system with commands like ls -l and cd. Eventually, we will stumble across something interesting, namely the directory /home/dave/Desktop with the following contents:
With a netcat shell, we can call cat [filename], copy the content and write it down on our local machine, so we have the information we need. With a meterpreter shell, we can call download [filename] and it will download the file contents to our own machine immediately. All files are relevant (we'll come to that later), but the most important for the current step is the file called "ssh". With cat ssh we can see that the contents are
In regards to the filename, and with some intuition, we can assume that these are credentials to access the SSH port we found during our port scan earlier.
And indeed, we now have SSH access to the target.
The next interesting file is the "Servers" file we acquired earlier. If we have a copy on our own machine, we can view it there, otherwise we can just use our SSH access and navigate to it via cd ~/Desktop and read its contents with cat Servers.
The content
combined with a part of the output of ipconfig:
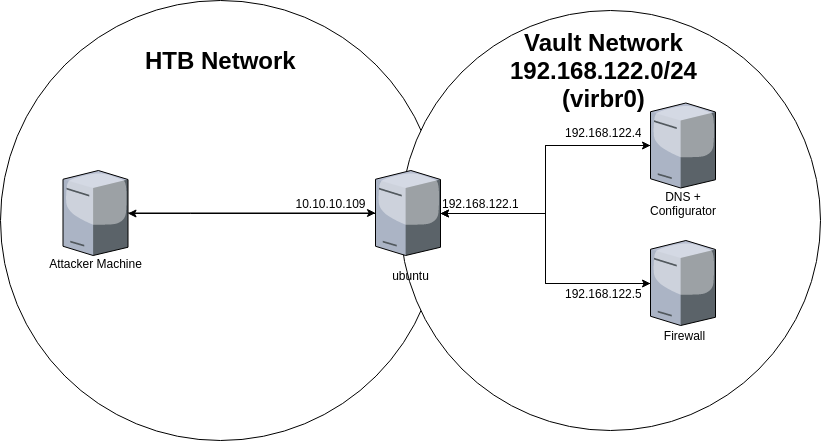
tells us that there are several machines, including the one we connected to via SSH, on the virbr0 network. The problem here is, that all our tools are on our own machine, but not on the machine we connected to, and we can't access these other machines from our own.
Here's a diagram to (hopefully) clarify why that is:
The solution: Tunneling. Tunneling will allow us to send internet traffic from our machine to the one with the SSH connection, which in turns forwards the traffic to any machine on the above mentioned virbr0 network. So, how do we do that?
Yes, it's just that easy
One we set that up, we can set a proxy in a browser of our choice (here are example instructions for Firefox and Chromium, guides for other browsers can also be found via a quick DuckDuckGo search). We can also install proxychains and edit
If we do that, we can then use
We see that a web server is running, so why not visit it in our browser? We are greeted with the 2 links that can be seen in the output from the curl request above.
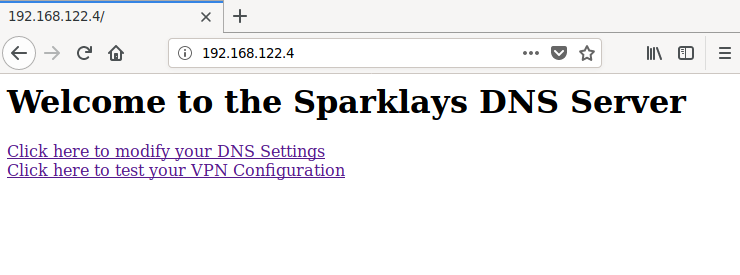
Following the link to dns-config.php will result in a 404, but the other link will guide us to a site where we apparently can modify the VPN configuration file of 192.168.122.4.
Some enumeration will offer us the page /notes with the following content:
"chmod 123.ovpn and script.sh to 777"
And, following our instincts, browsing to /123.ovpn and /script.sh of course results in more information:
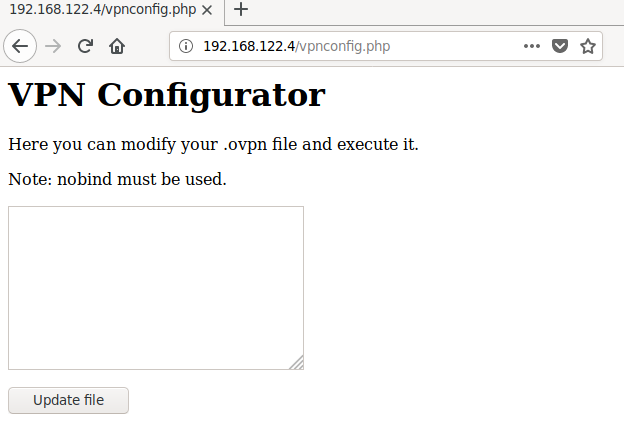
These contents of /script.sh tell us that some script executes the "123.ovpn" file as root. A combination of some further experimentation and intuition shows us that on /vpnconfig.php, the "Update file" action writes whatever we write into the text block to "123.ovpn", while "Test VPN" executes "script.sh". To summarize: We have full control over a configuration file, which is the basis of a command that is executed with root permissions. What to put into this configuration file?
Luckily for us, OpenVPN provides an option in the configuration file to execute any bash command after a VPN connection is established, with up "[command]". We don't need anything fancy, so we just create the most basic of basic configuration files:
The first line, remote 192.168.122.1 tells OpenVPN which VPN Server to connect to, which is necessary for the configuration to be valid. As is the second line, dev tun, which tells OpenVPN which network interface to use to establish the connection.
Before we can make use of this payload, we need to set up a listener on the "ubuntu" machine. For that, we connect to it via ssh, and enter, similar to our reverse shell above, nc -lvp [Port]. Now, when we upload the configuration file with "Update file", and then proceed to execute it with "Test VPN", we are greeted with the following:
Ladies and gentlemen, we got a shell.
Without much looking around, we get both the user flag and SSH credentials! The first is obviously an achievement in itself, the second can be used to connect via SSH to 192.168.122.4, so we can close our netcat shell.
Some more looking around gives us this:
The second-to-last line is most interesting for us here. It tells us that 192.168.122.5 (which we know from earlier acts as a Firewall) is the gateway to the 192.168.5.0/24 subnet.
For the next step, it makes sense to open two sessions on the DNS machine.
On the first session, we execute the following:
This opens a listener on localhost:[port], and forwards every connection that comes to this port to 192.168.5.2:987 from the local port 53. Now why did we do this? We are currently on a DNS server, an a Firewall is seperating us from the server we want to connect to. The server on the other side probably still wants to get DNS information, though, so the Firewall is in all likelihood configured to allow traffic coming from the DNS Server from the the default port for DNS, 53.
Where does the IP (192.168.5.2 come from, you ask?). Well, I previously skipped that, so here is where I got that IP from:
So, while the above netcat command is running, on the second sessions, we execute the following:
This connects to localhost:[port] via SSH, but thanks to the previous command, that connection is actually forwarded to 192.168.5.2:987, so we can connect to that machine. The -t bash just tells the SSH connection which shell we want to use, because otherwise the machine would only provide a limited feature shell.
We are greeted with this prompt:
dave@vault:~$
The box's name is "Vault", so with that hostname I guess we're getting close to the finish line.
And there's the root flag! But wait? ".gpg"? The root flag seems to be encrypted. Let's take a few steps back, and remember our beginnings.
When we first got a shell, we quickly found what we were looking for. But we didn't look around any further, as we thought we had all the information we needed. But that lead to an oversight. There is something really interesting on the first machine we landed on:
There is a GPG Keyring here. Maybe it can help us with the root flag? But first, we have to somehow get the flag on this machine. Nothing easier than that, thanks to scp, a tool that allows us to transfer files over SSH.
We have to do it step-by-step, as there is no direct route from "bault" to "ubuntu". So, first we get the flag from "vault" to "DNS":
We of course need to use our ncat proxy here again, as we still need to bypass the Firewall. Having done that, we can transfer the flag to the "ubuntu" machine:
Now we just have to decrypt it:
A passphrase, hm? Remember earlier, when I said that all the files in /home/dave/Desktop, Servers, key and ssh were important. Well, I wasn't lying:
If we then try to encrypt again, and enter the passphrase:
We got our root flag!